 Fireboy & Watergirl
Forest · LEVEL 11 · Verified walkthrough
The Hidden Diamond
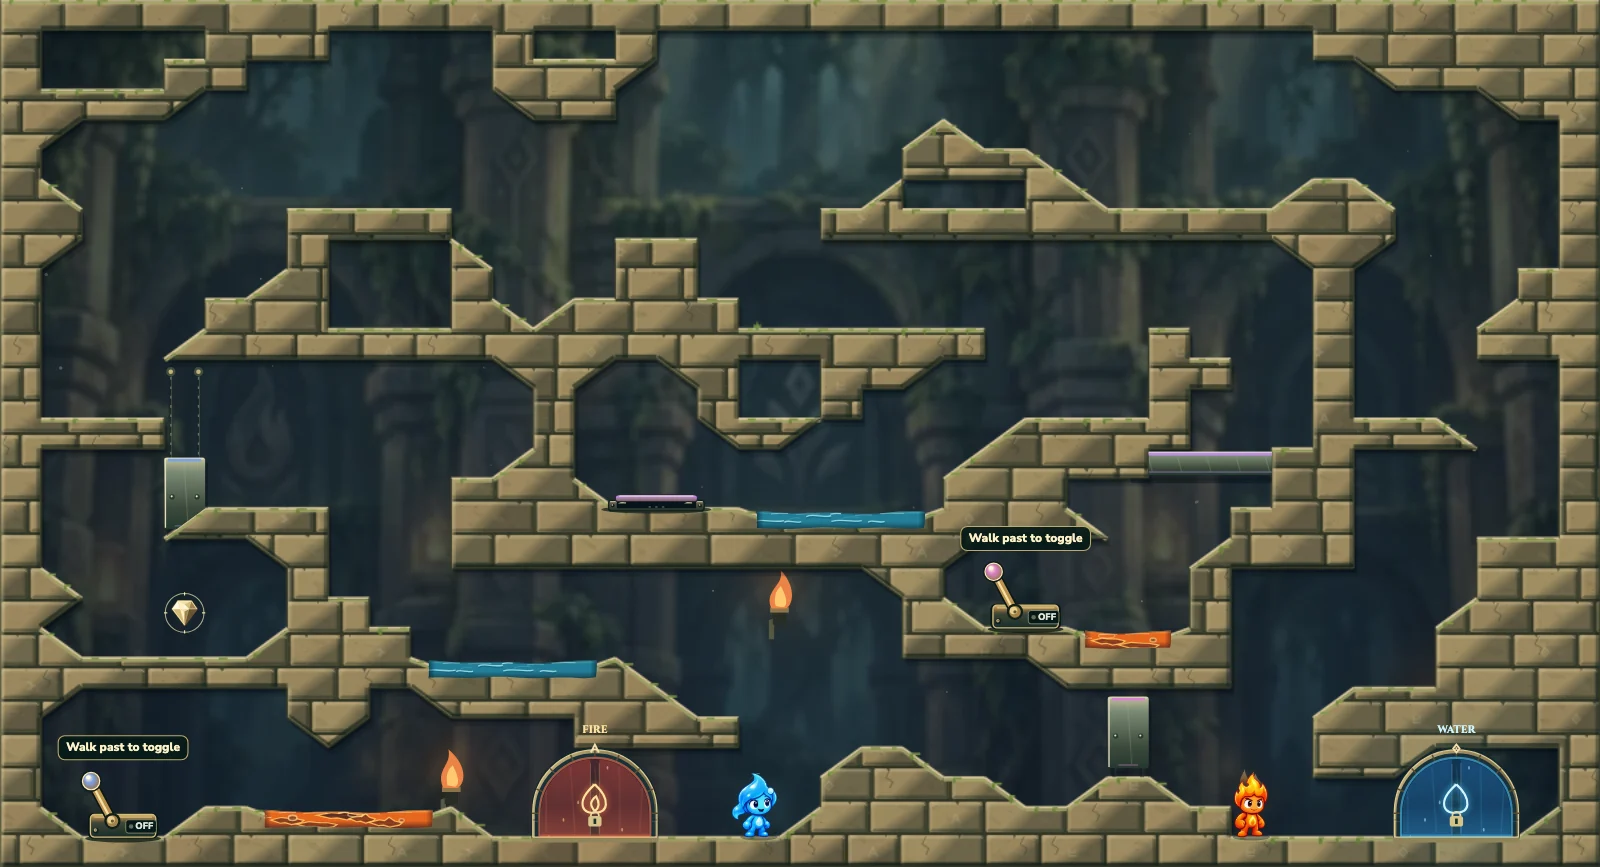
Watergirl holds the middle bridge plate so Fireboy can open the bottom passage. Then Fireboy operates the blue lever while Watergirl collects the required white diamond.
Level objective
Collect all 1 ring-marked diamond, then bring Fireboy to the orange exit in the lower center and Watergirl to the blue exit in the lower right. Both heroes must be at their own doors together.
| Campaign | The Forest Temple · 11 of 32 |
|---|---|
| Collectibles | 0 fire diamonds, 0 water diamonds, 1 neutral diamonds. 1 marked diamonds required; 0 optional. |
| Hazards | 2 lava pools, 2 water pools. Only your own element is safe; purple goo is dangerous to both. |
| Mechanisms | 1 plate, 2 levers, 3 moving platforms |
| Win condition | Collect all 1 ring-marked diamond, then bring Fireboy to the orange exit in the lower center and Watergirl to the blue exit in the lower right. Both heroes must be at their own doors together. |
| Exits | Fireboy: lower center. Watergirl: lower right. |
Step-by-step walkthrough
Watergirl climbs the left staircase
The bottom purple bar begins CLOSED. Watergirl jumps straight UP beside the shelf to her LEFT, then steers onto it near the top of the jump. Follow the blue pool LEFT. Jump onto the two small stone steps at its left edge. From the higher step, jump UP before steering LEFT onto the shelf beside the blue bar.
Climb from the left wall into the upper maze
Watergirl jumps LEFT onto the projecting wall ledge. Jump UP before steering RIGHT onto the stone shelf above. Continue up the next steps, then jump RIGHT across the upper-left walkway and onto the central pillar. Follow the central shelf RIGHT, drop around its right edge, and land on the sloping middle ledge.
Watergirl holds the middle pressure plate
From that middle ledge, Watergirl moves LEFT through her blue basin to the purple pressure plate. Stand still on it. This slides the bridge away from the upper-right shaft. Keep Watergirl here until Fireboy has opened the lower purple lever and reached the blue lever at the bottom-left.
Fireboy climbs the outside-right route
Fireboy stays on his starting side and moves RIGHT. Jump UP before steering onto the raised right-hand ledge. Climb the next two steps toward the wall. Continue with rising jumps onto the projecting LEFT shelf, the RIGHT shelf above it, and then the top walkway. Travel LEFT across the upper route and drop around the middle shelf’s right edge onto the sloping ledge below.
Cross the open shaft to the lower purple lever
Fireboy jumps RIGHT from the sloping ledge onto the small hanging step, then steps RIGHT into the shaft that Watergirl is holding open. At the bottom, walk LEFT into the orange basin and past the purple lever. Leave it ON: the vertical bar in the bottom corridor lowers, opening the route between the starting areas.
Fireboy returns through the upper route
Jump RIGHT toward the orange basin’s bank, then jump UP before steering onto the higher step beside it. Continue RIGHT onto the narrow stone wall and LEFT onto the hanging step above. Jump LEFT to the sloping middle ledge, then LEFT again onto the central shelf. Move to its left end, jump onto the central pillar, and jump RIGHT back to the top walkway.
Reach the blue lever from the bottom
Fireboy jumps over the top walkway’s raised crest and continues RIGHT. Descend the outside-right steps by alternating LEFT and RIGHT around their ends, then drop LEFT onto the bottom-right floor. Jump LEFT across the now-open purple passage and the central mound. Walk LEFT through the bottom orange pool to the blue lever. Walking past turns it ON; use the interaction control once to leave it OFF for Watergirl’s first crossing.
Watergirl leaves the plate and circles back left
Watergirl can now leave the middle plate. Follow her blue basin RIGHT, jump onto the sloping ledge and walk up to its crest. Jump LEFT onto the central shelf, then continue LEFT over the central pillars and upper-left walkway. Drop onto the wall ledge above the blue bar. Jump RIGHT past the lowered bar onto the small stone shelf, then stop.
Raise the blue bar for the diamond chamber
With Watergirl safely on the small shelf, Fireboy uses the blue lever again to switch it ON. Wait for the bar to rise. Watergirl can now move LEFT underneath it and drop into the chamber below. Walk RIGHT through the white diamond. This diamond is REQUIRED to finish.
Leave the chamber and return to the bottom
Keep the blue bar raised. Watergirl jumps LEFT onto the small triangular foothold at the chamber wall, then RIGHT onto the shelf above. Jump RIGHT over the dividing wall and follow the blue pool. Continue RIGHT over the central mound and through the already-open purple passage.
Enter both matching exits
Watergirl enters the blue door at the bottom-right. Fireboy walks RIGHT from the blue lever through his orange pool to the orange door. The first hero waits inside their door; both matching exits and the white diamond finish the room.
This route was verified in the game simulation using player controls, required diamonds, and both matching exits. It describes this version’s independently reconstructed room, not an official walkthrough.
How this room’s mechanisms work
Switch 1
middle center
Keep a hero or movable weight on this plate to keep its signal active. Stepping off releases it.
Controls Moving platform 1.
Switch 2
lower center
Walk past the handle, or use it nearby: Enter for Fireboy, E for Watergirl, or the touch Use button. Each use toggles it; it stays set after you leave.
Controls Moving platform 2.
Switch 3
lower left
Walk past the handle, or use it nearby: Enter for Fireboy, E for Watergirl, or the touch Use button. Each use toggles it; it stays set after you leave.
Controls Moving platform 3.
Moving platform 1
middle right
At least one of these inputs must be active: Switch 1.
When powered, it moves left; when power is released, it returns.
Moving platform 2
lower right
At least one of these inputs must be active: Switch 2.
When powered, it moves down; when power is released, it returns.
Moving platform 3
middle left
At least one of these inputs must be active: Switch 3.
When powered, it moves up; when power is released, it returns.
If you get stuck
Check the unfinished objective
Count the ring-marked diamonds still visible. All 1 are required before both matching doors can finish this room; each hero collects their own color.
A gate or platform moved back
A pressure plate releases when its rider or weight leaves. Keep your partner on it until you are safely across. Levers stay set after you leave; check their ON or OFF state before crossing.
You missed a moving platform
Return to safe ground and use the connected switch to bring it back. Board before your partner releases the plate or changes the lever. Avoid jumping into its underside; line up with the open shaft first.
You cannot recover safely
Pause and choose Restart level to reset both heroes, diamonds, weights, and switches. Previously completed levels stay saved. Follow the step order before moving a box or releasing a weight.
For touch controls, jumping, audio, or online connection problems, see player troubleshooting.
Level questions
How do you finish The Hidden Diamond?
Watergirl holds the middle bridge plate so Fireboy can open the bottom passage. Then Fireboy operates the blue lever while Watergirl collects the required white diamond. Collect all 1 ring-marked diamond, then bring Fireboy to the orange exit in the lower center and Watergirl to the blue exit in the lower right. Both heroes must be at their own doors together.
How many diamonds are required in The Hidden Diamond?
1 diamond: 1 for either hero. 1 ring-marked diamond is required to finish.
Which hazards are in The Hidden Diamond?
2 orange lava pools (lower right and lower left) and 2 blue water pools (middle center and lower left). Fireboy can enter orange lava; Watergirl must avoid it. Watergirl can enter blue water; Fireboy must avoid it. If either hero falls into a dangerous pool, both players restart the level.
What do the switches do in The Hidden Diamond?
Switch 1 (middle center): Controls Moving platform 1. Keep a hero or movable weight on this plate to keep its signal active. Stepping off releases it. Switch 2 (lower center): Controls Moving platform 2. Walk past the handle, or use it nearby: Enter for Fireboy, E for Watergirl, or the touch Use button. Each use toggles it; it stays set after you leave. Switch 3 (lower left): Controls Moving platform 3. Walk past the handle, or use it nearby: Enter for Fireboy, E for Watergirl, or the touch Use button. Each use toggles it; it stays set after you leave.