 Fireboy & Watergirl
Fairies · LEVEL 24 · Verified walkthrough
The Great Lamp Tower
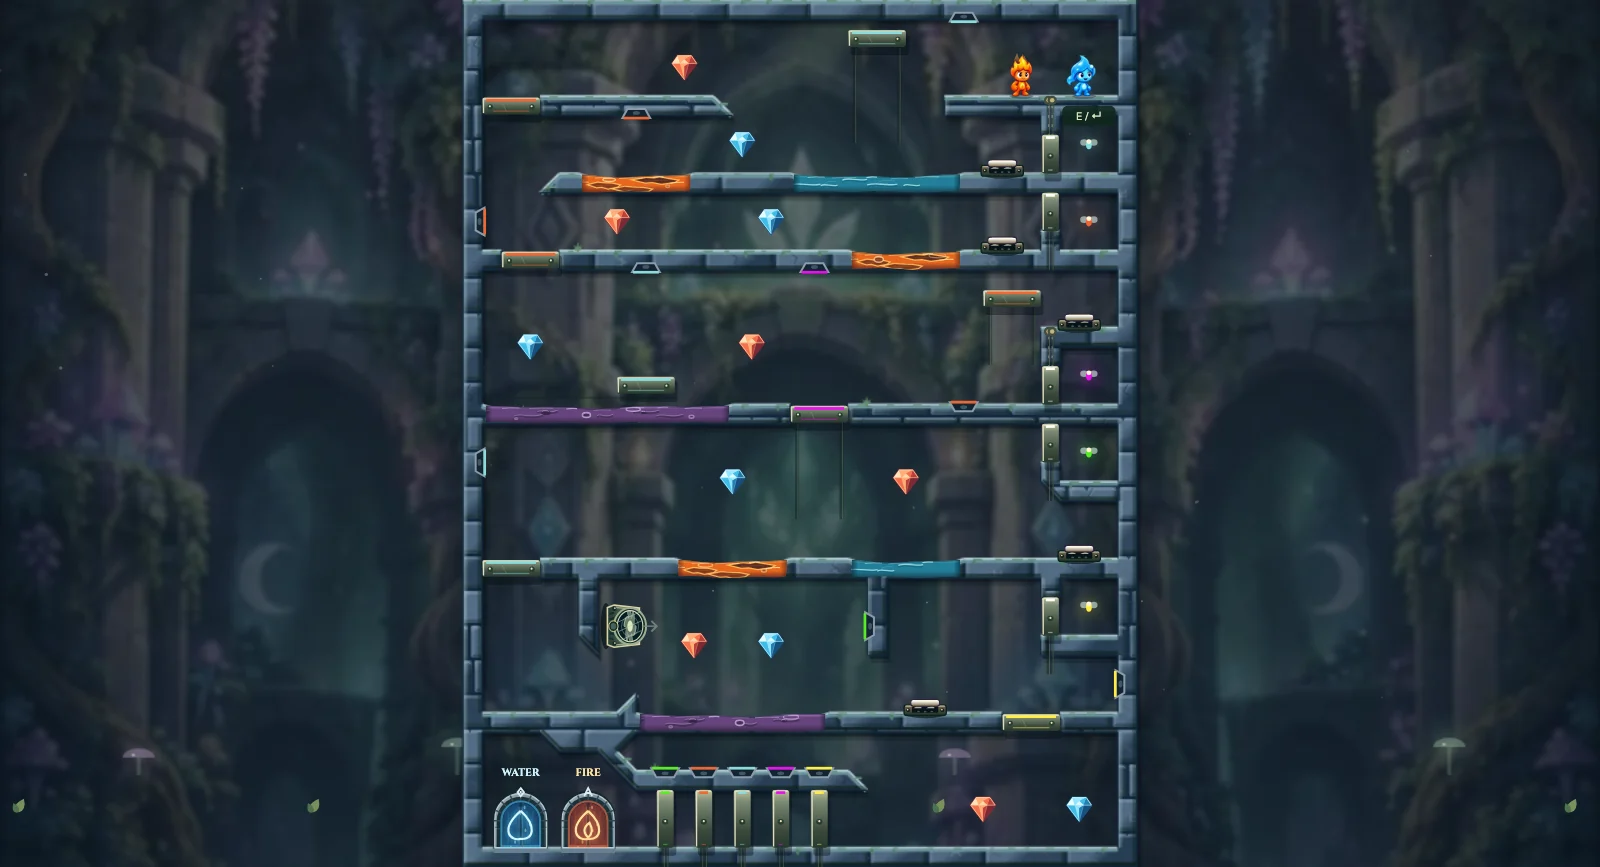
Work down the tower, freeing all five fairies and collecting twelve diamonds. Use the cyan platform over the first goo pool, the pink lift in the middle and the green fairy’s wind over the lower pool. Bring every fairy to its matching lamp above the final five gates.
Level objective
Bring Fireboy to the orange exit in the lower center and Watergirl to the blue exit in the lower left. Both heroes must be at their own doors together. The 12 unmarked diamonds are optional; collect every diamond for a perfect clear.
| Campaign | Fairy Tales · 24 of 31 |
|---|---|
| Collectibles | 6 fire diamonds, 6 water diamonds. 0 marked diamonds required; 12 optional. |
| Hazards | 3 lava pools, 2 water pools, 2 purple goo pools. Only your own element is safe; purple goo is dangerous to both. |
| Mechanisms | 5 plates, 18 moving platforms, 5 fairies, 14 fairy lamps, 1 fan |
| Win condition | Bring Fireboy to the orange exit in the lower center and Watergirl to the blue exit in the lower left. Both heroes must be at their own doors together. The 12 unmarked diamonds are optional; collect every diamond for a perfect clear. |
| Exits | Fireboy: lower center. Watergirl: lower left. |
Step-by-step walkthrough
Free the cyan fairy
Watergirl drops left from the starting shelf into the water below, then walks right onto the white button. Drag the freed cyan fairy out of its right-hand cage and into the cyan lamp on the ceiling. Wait for its upper platform to lower. Fireboy stays on the starting shelf.
Reach the first red diamond
Fireboy jumps left from the starting shelf onto the lowered cyan platform. Walk to its left edge and jump left onto the high stone shelf. Collect the red diamond there.
Free the orange fairy
Keep Watergirl on the button. Guide cyan around the left end of the upper pool floor, then right underneath it onto the next white button. Drag the orange fairy out of its cage and into the orange lamp underneath the high left shelf. Return cyan to the ceiling lamp and wait for its platform to lower again.
Bring Watergirl down the left side
Watergirl walks left through her water pool to collect the blue diamond on the central bank. Return into the water just left of the cyan platform, jump onto it, then jump left from its edge onto the high shelf. Both heroes can now walk off that shelf’s far-left edge and land on the orange platform below.
Collect the next pair
Walk Fireboy right through the red diamond above the next floor, and Watergirl farther right to the blue diamond. Return both to the stone floor near the left orange platform, leaving that platform empty.
Board the cyan ferry
Move orange into the lamp on the far-left wall to open the first drop. Guide cyan through that opening into the cyan lamp underneath the floor. Wait for the platform over the goo to move left. Walk both heroes off the left side onto it; Watergirl collects the blue diamond as she drops.
Cross the first goo pool
With both heroes aboard, move cyan out of its lamp into the clear space beside it. Wait for the platform to finish travelling right. Each hero walks to its right edge and jumps right onto the central bank. Fireboy collects the red diamond above the bank.
Free the pink fairy
Guide orange down through the left opening before its platform closes, then across to the orange lamp on the right-hand bank. Wait for the orange platform to lower. Fireboy crosses the middle bridge, jumps onto the lowered orange platform, then jumps right onto the white button. Drag the freed pink fairy into the pink lamp underneath the central ceiling.
Collect the blue diamond above the lower lava
Wait for the pink lift to lower. Watergirl walks onto it and moves to its left edge. Jump left toward the nearby blue diamond, stay just to its right until it is collected, then steer back right onto the pink lift. Keep clear of the lava below.
Collect the red diamond and free green
Fireboy drops left from the button shelf onto the middle bank, then walks onto the lowered pink lift. Jump from its right edge over the water to the far-right bank, collecting the red diamond on the way. Walk right onto the white button to release the green fairy.
Open the lower-left drop
Guide cyan into the lamp on the far-left wall below the first goo floor. Wait for its lower platform to move aside. Guide green down through the open passage and into the green lamp on the wall beside the horizontal wind.
Bring both heroes to the lower goo pool
Watergirl jumps left from the pink lift over the lava, then walks left through the opened drop. Fireboy returns left over the water onto the pink lift, walks through his lava pool and follows her through the drop. Both land on the safe floor at the left of the lower goo pool.
Use the wind to cross
One hero at a time, climb the short slope at the left edge of the goo and jump right into the powered wind. Keep steering right until you land on the far bank. Fireboy collects the red diamond in the air; Watergirl collects the blue one. Leave green in its lamp until both are across.
Free yellow and reach the bottom
Fireboy stands on the white button on the right bank. Guide yellow out of its cage and down into the yellow lamp on the right wall. Wait for the yellow bridge to move left. Walk both heroes through the opening to its right and collect their diamonds on the bottom floor.
Open all five final gates
Guide green and orange into their matching lamps just above the five bottom gates. Bring pink down next, while cyan still holds the lower-left passage open. Then bring cyan straight down through that passage and into its bottom lamp. Move yellow left into the open shaft beside its bridge, down through it and into the final yellow lamp. Wait for all five gates to lower.
Enter the matching doors
Walk left along the bottom floor through the five open gates. Fireboy enters the red door and Watergirl enters the blue door. Either hero can finish first; all twelve diamonds are available before entering.
This route was verified in the game simulation using player controls, required diamonds, and both matching exits. It describes this version’s independently reconstructed room, not an official walkthrough.
How this room’s mechanisms work
Switch 1
upper center
Keep a hero or movable weight on this plate to keep its signal active. Stepping off releases it. A free fairy can also activate it by touching it.
Controls Moving platform 1.
Switch 2
upper center
Keep a hero or movable weight on this plate to keep its signal active. Stepping off releases it. A free fairy can also activate it by touching it.
Controls Moving platform 4.
Switch 3
middle right
Keep a hero or movable weight on this plate to keep its signal active. Stepping off releases it. A free fairy can also activate it by touching it.
Controls Moving platform 7.
Switch 4
middle right
Keep a hero or movable weight on this plate to keep its signal active. Stepping off releases it. A free fairy can also activate it by touching it.
Controls Moving platform 10.
Switch 5
lower center
Keep a hero or movable weight on this plate to keep its signal active. Stepping off releases it. A free fairy can also activate it by touching it.
Controls Moving platform 17.
Moving platform 1
upper center
At least one of these inputs must be active: Switch 1.
When powered, it moves up; when power is released, it returns.
Moving platform 2
upper center
At least one of these inputs must be active: Fairy lamp 1.
When powered, it moves down; when power is released, it returns.
Moving platform 3
middle center
At least one of these inputs must be active: Fairy lamp 2.
When powered, it moves left; when power is released, it returns.
Moving platform 4
upper center
At least one of these inputs must be active: Switch 2.
When powered, it moves down; when power is released, it returns.
Moving platform 5
upper left
At least one of these inputs must be active: Fairy lamp 3.
When powered, it moves right; when power is released, it returns.
Moving platform 6
upper left
At least one of these inputs must be active: Fairy lamp 4.
When powered, it moves right; when power is released, it returns.
Moving platform 7
middle center
At least one of these inputs must be active: Switch 3.
When powered, it moves up; when power is released, it returns.
Moving platform 8
middle center
At least one of these inputs must be active: Fairy lamp 5.
When powered, it moves down; when power is released, it returns.
Moving platform 9
middle center
At least one of these inputs must be active: Fairy lamp 6.
When powered, it moves down; when power is released, it returns.
Moving platform 10
middle center
At least one of these inputs must be active: Switch 4.
When powered, it moves down; when power is released, it returns.
Moving platform 11
middle left
At least one of these inputs must be active: Fairy lamp 7.
When powered, it moves right; when power is released, it returns.
Moving platform 12
lower center
At least one of these inputs must be active: Fairy lamp 9.
When powered, it moves down; when power is released, it returns.
Moving platform 13
lower center
At least one of these inputs must be active: Fairy lamp 10.
When powered, it moves down; when power is released, it returns.
Moving platform 14
lower center
At least one of these inputs must be active: Fairy lamp 11.
When powered, it moves down; when power is released, it returns.
Moving platform 15
lower center
At least one of these inputs must be active: Fairy lamp 12.
When powered, it moves down; when power is released, it returns.
Moving platform 16
lower center
At least one of these inputs must be active: Fairy lamp 13.
When powered, it moves down; when power is released, it returns.
Moving platform 17
lower center
At least one of these inputs must be active: Switch 5.
When powered, it moves down; when power is released, it returns.
Moving platform 18
lower center
At least one of these inputs must be active: Fairy lamp 14.
When powered, it moves left; when power is released, it returns.
Fairy 1
middle right
Drag the fairy with a mouse or finger. Release to stop moving it.
Guide it through open passages into a matching-color lamp. White fairies can use any lamp. Stone and moving barriers block its path; open the physical passage before moving a fairy through it.
Fairy 2
middle right
Drag the fairy with a mouse or finger. Release to stop moving it.
Guide it through open passages into a matching-color lamp. White fairies can use any lamp. Stone and moving barriers block its path; open the physical passage before moving a fairy through it.
Fairy 3
upper right
Drag the fairy with a mouse or finger. Release to stop moving it.
Guide it through open passages into a matching-color lamp. White fairies can use any lamp. Stone and moving barriers block its path; open the physical passage before moving a fairy through it.
Fairy 4
upper right
Drag the fairy with a mouse or finger. Release to stop moving it.
Guide it through open passages into a matching-color lamp. White fairies can use any lamp. Stone and moving barriers block its path; open the physical passage before moving a fairy through it.
Fairy 5
lower right
Drag the fairy with a mouse or finger. Release to stop moving it.
Guide it through open passages into a matching-color lamp. White fairies can use any lamp. Stone and moving barriers block its path; open the physical passage before moving a fairy through it.
Fairy lamp 1
upper center
The lamp needs no switch power. A matching-color fairy must remain in its cup; white fairies match any color.
While occupied, it activates Moving platform 2. Moving the fairy away releases that signal.
Fairy lamp 2
upper center
The lamp needs no switch power. A matching-color fairy must remain in its cup; white fairies match any color.
While occupied, it activates Moving platform 3. Moving the fairy away releases that signal.
Fairy lamp 3
upper left
The lamp needs no switch power. A matching-color fairy must remain in its cup; white fairies match any color.
While occupied, it activates Moving platform 5. Moving the fairy away releases that signal.
Fairy lamp 4
upper center
The lamp needs no switch power. A matching-color fairy must remain in its cup; white fairies match any color.
While occupied, it activates Moving platform 6. Moving the fairy away releases that signal.
Fairy lamp 5
middle center
The lamp needs no switch power. A matching-color fairy must remain in its cup; white fairies match any color.
While occupied, it activates Moving platform 8. Moving the fairy away releases that signal.
Fairy lamp 6
upper center
The lamp needs no switch power. A matching-color fairy must remain in its cup; white fairies match any color.
While occupied, it activates Moving platform 9. Moving the fairy away releases that signal.
Fairy lamp 7
middle left
The lamp needs no switch power. A matching-color fairy must remain in its cup; white fairies match any color.
While occupied, it activates Moving platform 11. Moving the fairy away releases that signal.
Fairy lamp 8
lower center
The lamp needs no switch power. A matching-color fairy must remain in its cup; white fairies match any color.
While occupied, it activates Fan 1. Moving the fairy away releases that signal.
Fairy lamp 9
lower center
The lamp needs no switch power. A matching-color fairy must remain in its cup; white fairies match any color.
While occupied, it activates Moving platform 12. Moving the fairy away releases that signal.
Fairy lamp 10
lower center
The lamp needs no switch power. A matching-color fairy must remain in its cup; white fairies match any color.
While occupied, it activates Moving platform 13. Moving the fairy away releases that signal.
Fairy lamp 11
lower center
The lamp needs no switch power. A matching-color fairy must remain in its cup; white fairies match any color.
While occupied, it activates Moving platform 14. Moving the fairy away releases that signal.
Fairy lamp 12
lower center
The lamp needs no switch power. A matching-color fairy must remain in its cup; white fairies match any color.
While occupied, it activates Moving platform 15. Moving the fairy away releases that signal.
Fairy lamp 13
lower center
The lamp needs no switch power. A matching-color fairy must remain in its cup; white fairies match any color.
While occupied, it activates Moving platform 16. Moving the fairy away releases that signal.
Fairy lamp 14
lower right
The lamp needs no switch power. A matching-color fairy must remain in its cup; white fairies match any color.
While occupied, it activates Moving platform 18. Moving the fairy away releases that signal.
Fan 1
lower center
At least one of these inputs must be active: Fairy lamp 8.
The air current pushes right. Stay in the stream until you can move onto a dry landing.
If you get stuck
Check the unfinished objective
The diamonds in this room are optional. If you only want to finish, bring both heroes fully inside their own matching doors.
A gate or platform moved back
A pressure plate releases when its rider or weight leaves. Keep your partner on it until you are safely across. Levers stay set after you leave; check their ON or OFF state before crossing.
You missed a moving platform
Return to safe ground and use the connected switch to bring it back. Board before your partner releases the plate or changes the lever. Avoid jumping into its underside; line up with the open shaft first.
A fairy will not reach its lamp
Guide it through the open corridor instead of dragging through stone. Clear the barrier first and match the lamp color; a white fairy can light any lamp. Keep the fairy in the cup while its connected platform is needed.
You cannot recover safely
Pause and choose Restart level to reset both heroes, diamonds, weights, and switches. Previously completed levels stay saved. Follow the step order before moving a box or releasing a weight.
For touch controls, jumping, audio, or online connection problems, see player troubleshooting.
Level questions
How do you finish The Great Lamp Tower?
Work down the tower, freeing all five fairies and collecting twelve diamonds. Use the cyan platform over the first goo pool, the pink lift in the middle and the green fairy’s wind over the lower pool. Bring every fairy to its matching lamp above the final five gates. Bring Fireboy to the orange exit in the lower center and Watergirl to the blue exit in the lower left. Both heroes must be at their own doors together. The 12 unmarked diamonds are optional; collect every diamond for a perfect clear.
How many diamonds are required in The Great Lamp Tower?
12 diamonds: 6 for Fireboy and 6 for Watergirl. None are required to finish. 12 unmarked diamonds are optional collectibles for a perfect clear.
Which hazards are in The Great Lamp Tower?
3 orange lava pools (upper center and middle center), 2 blue water pools (upper center and middle center), and 2 purple goo pools (middle center and lower center). Fireboy can enter orange lava; Watergirl must avoid it. Watergirl can enter blue water; Fireboy must avoid it. Purple goo defeats either hero. If either hero falls into a dangerous pool, both players restart the level.
What do the switches do in The Great Lamp Tower?
Switch 1 (upper center): Controls Moving platform 1. Keep a hero or movable weight on this plate to keep its signal active. Stepping off releases it. A free fairy can also activate it by touching it. Switch 2 (upper center): Controls Moving platform 4. Keep a hero or movable weight on this plate to keep its signal active. Stepping off releases it. A free fairy can also activate it by touching it. Switch 3 (middle right): Controls Moving platform 7. Keep a hero or movable weight on this plate to keep its signal active. Stepping off releases it. A free fairy can also activate it by touching it. Switch 4 (middle right): Controls Moving platform 10. Keep a hero or movable weight on this plate to keep its signal active. Stepping off releases it. A free fairy can also activate it by touching it. Switch 5 (lower center): Controls Moving platform 17. Keep a hero or movable weight on this plate to keep its signal active. Stepping off releases it. A free fairy can also activate it by touching it.