 Fireboy & Watergirl
Crystal · LEVEL 31 · Verified walkthrough
The Mirrored Crystal Loop
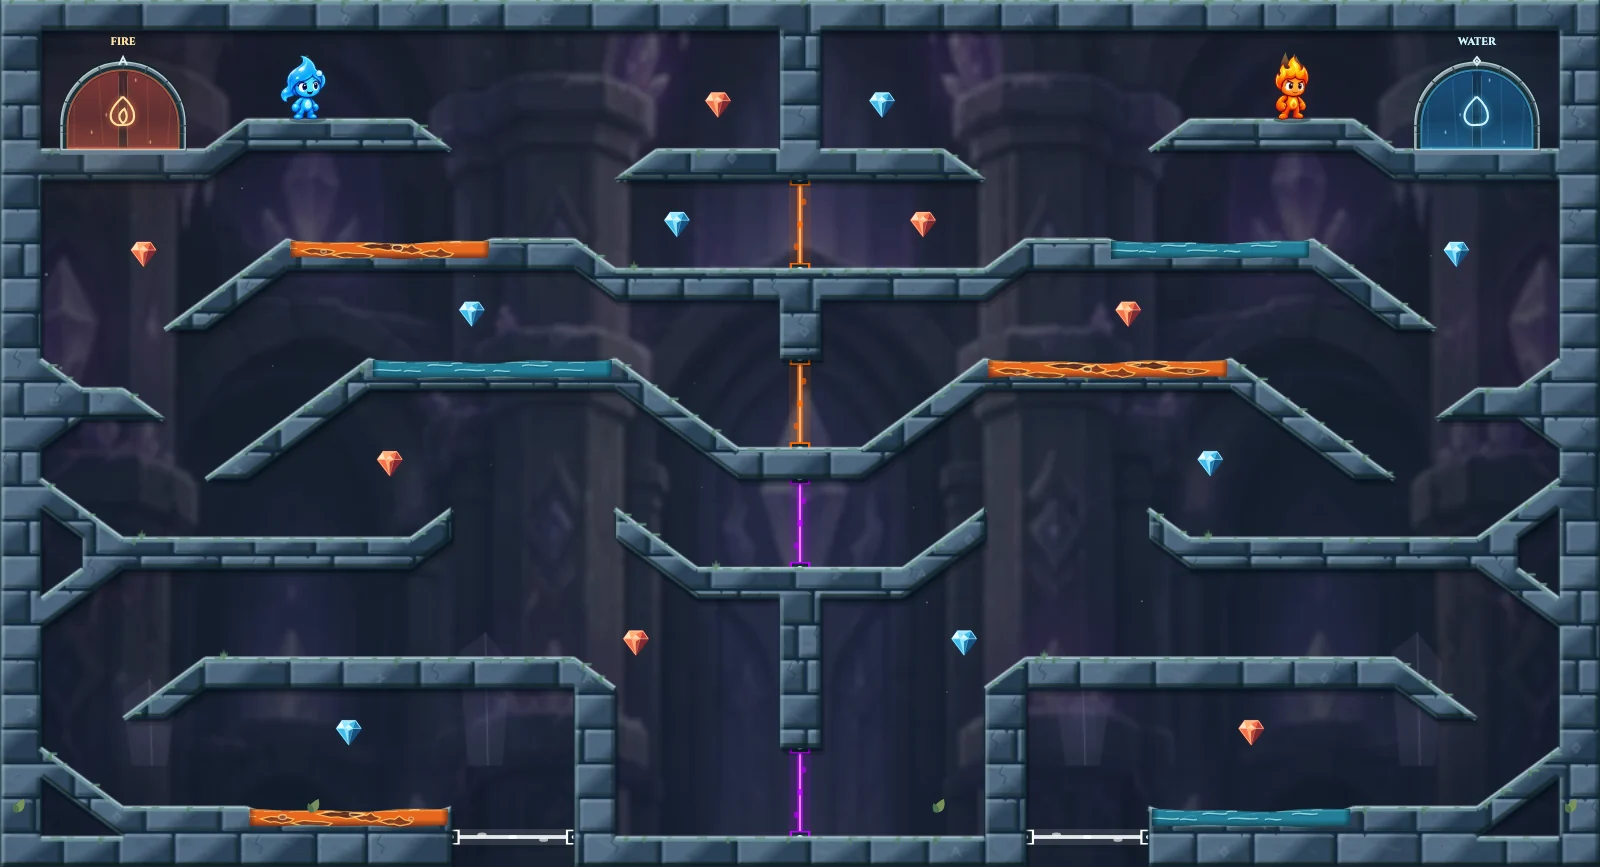
Descend through the orange crystals, use the white floor crystals to cross the chamber, then return upward through the purple pair. Collect seven matching diamonds with each hero before reaching the opposite upper exit.
Level objective
Bring Fireboy to the orange exit in the upper left and Watergirl to the blue exit in the upper right. Both heroes must be at their own doors together. The 14 unmarked diamonds are optional; collect every diamond for a perfect clear.
| Campaign | The Crystal Temple · 31 of 39 |
|---|---|
| Collectibles | 7 fire diamonds, 7 water diamonds. 0 marked diamonds required; 14 optional. |
| Hazards | 3 lava pools, 3 water pools. Only your own element is safe; purple goo is dangerous to both. |
| Mechanisms | 6 portals |
| Win condition | Bring Fireboy to the orange exit in the upper left and Watergirl to the blue exit in the upper right. Both heroes must be at their own doors together. The 14 unmarked diamonds are optional; collect every diamond for a perfect clear. |
| Exits | Fireboy: upper left. Watergirl: upper right. |
Step-by-step walkthrough
Take turns around the mirrored chamber
Leave one hero on the safe starting shelf while the other completes the loop. Fireboy starts at the upper right and finishes at the upper-left orange door; Watergirl follows the mirrored route from left to right.
Reach the orange crystal
Move inward from the starting shelf and jump over the opposite-element pool below it. Collect the matching diamond beside the upper orange crystal, then enter that crystal to reach the lower central walkway.
Cross the matching pool and descend outside
Move outward from the lower orange crystal. Jump onto the raised walkway, collect its matching diamond and cross your own element’s pool. Continue down the outside ledges toward the bottom corner.
Use the white floor crystal
Collect the matching diamond beneath the lowest outside shelf while staying above the opposite-element pool. Jump toward the white floor crystal in the open shaft beside that pool. It carries you across the room and turns your downward motion into an upward launch. Steer onto the inner edge of the opposite lower shelf and collect its matching diamond.
Return through the purple crystal
Descend into the central bottom passage and cross its purple crystal to emerge on the higher central shelf. Move outward toward the new side, jump onto the side ledge and collect the matching diamond above it.
Climb the outside steps
Continue toward the outside wall. Use the small wall ledges to climb back to the upper pool walkway, collecting the matching diamond near the wall. Jump over any opposite-element pool as you move back toward the middle.
Collect the last diamond and reach the exit
Jump onto the high central shelf on your current side and collect the seventh matching diamond. Return across the gap to the upper starting shelf on this side, then walk outward to the matching exit. Repeat the mirrored loop with the waiting hero to collect all fourteen diamonds and finish together.
This route was verified in the game simulation using player controls, required diamonds, and both matching exits. It describes this version’s independently reconstructed room, not an official walkthrough.
How this room’s mechanisms work
Portal 1
lower left
This portal needs no switch power.
Step inside to travel to Portal 2. Step out of the destination before trying to return.
Portal 2
lower right
This portal needs no switch power.
Step inside to travel to Portal 1. Step out of the destination before trying to return.
Portal 3
lower center
This portal needs no switch power.
Step inside to travel to Portal 4. Step out of the destination before trying to return.
Portal 4
middle center
This portal needs no switch power.
Step inside to travel to Portal 3. Step out of the destination before trying to return.
Portal 5
middle center
This portal needs no switch power.
Step inside to travel to Portal 6. Step out of the destination before trying to return.
Portal 6
upper center
This portal needs no switch power.
Step inside to travel to Portal 5. Step out of the destination before trying to return.
If you get stuck
Check the unfinished objective
The diamonds in this room are optional. If you only want to finish, bring both heroes fully inside their own matching doors.
You cannot recover safely
Pause and choose Restart level to reset both heroes, diamonds, weights, and switches. Previously completed levels stay saved. Follow the step order before moving a box or releasing a weight.
For touch controls, jumping, audio, or online connection problems, see player troubleshooting.
Level questions
How do you finish The Mirrored Crystal Loop?
Descend through the orange crystals, use the white floor crystals to cross the chamber, then return upward through the purple pair. Collect seven matching diamonds with each hero before reaching the opposite upper exit. Bring Fireboy to the orange exit in the upper left and Watergirl to the blue exit in the upper right. Both heroes must be at their own doors together. The 14 unmarked diamonds are optional; collect every diamond for a perfect clear.
How many diamonds are required in The Mirrored Crystal Loop?
14 diamonds: 7 for Fireboy and 7 for Watergirl. None are required to finish. 14 unmarked diamonds are optional collectibles for a perfect clear.
Which hazards are in The Mirrored Crystal Loop?
3 orange lava pools (upper left, middle right, and lower left) and 3 blue water pools (upper right, middle left, and lower right). Fireboy can enter orange lava; Watergirl must avoid it. Watergirl can enter blue water; Fireboy must avoid it. If either hero falls into a dangerous pool, both players restart the level.
Does The Mirrored Crystal Loop need a partner to hold a switch?
There are no levers or pressure plates in this room. Each hero can follow their own route, but both matching exits are still needed to finish.